 German
 Electronic
altimeter:
Building a precise electronic altimeter isn’t difficult. All you need is a
absolute pressure sensor, a A/D-converter, a microcontroller and a LCD-display.
Furthermore a thermistor (used with a self calibrating measuring method), for
temperature compensation, is needed.
Electronic
altimeter:
Building a precise electronic altimeter isn’t difficult. All you need is a
absolute pressure sensor, a A/D-converter, a microcontroller and a LCD-display.
Furthermore a thermistor (used with a self calibrating measuring method), for
temperature compensation, is needed.
Hardware: The circuit is split into two parts – the analog and the digital one.
A
Motorola pressure sensor MPX4100 in a SMD package is populated on the analog
PCB. This sensor can be ordered on several distributors (even Conrad-Elektronik).
The sensor output is directly leaded to the input of a high resolution 16bit ADC. The CS5509 from Crystal (Cirrus Logic) was used, because it was easy to get via home page sample order. The voltage supply consists of a voltage stabilizer (7805) from Motorola and a voltage reference (REF195) from Analog Devices.
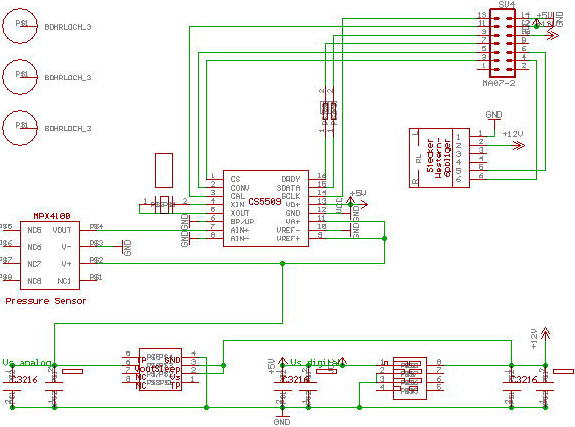
For preventing noise, coming from the digital into the analog electronic, all the digital was placed separate on the second PCB, connected via a double row connector to the analog PCB. The digital part consists of the PIC microcontroller, a LCD-display, 6 keys, a D/A-converter for controlling the LCD contrast, a thermistor for temperature measurement, a EEPROM for storing calibration data and a RS232 interface for PC communication.
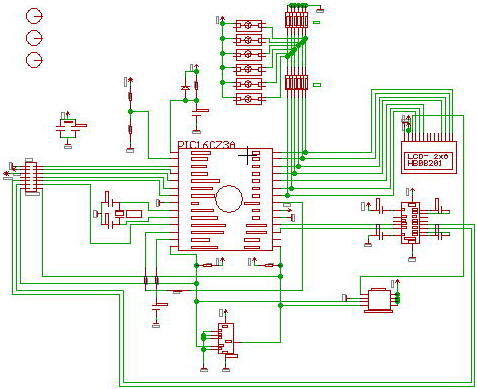
The PIC microcontroller is reading the A/D-converter and calculates, together with the temperature information, the height. This height is then displayed on the LCD. Because the circuit is self-explaining, the EAGLE-files are provided for downloading with just a few comments. I want to remark, that it will be the better choice, to use the PIC16F876 instead of the 16C73A. This PIC is fully compatible to the 16C73A and got furthermore flash program and EEPROM memory. If you are using this PIC, you can do the circuit without the external EEPROM.
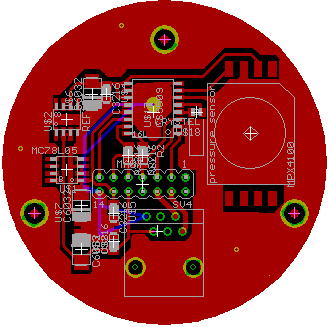
The light version of EAGLE has been used for the schematic and layout design. It can be downloaded from the Cadsoft homepage and demonstrates, how powerful this tool is. The limitations (just 2 layer and size only up to 10cm x 8cm) are insignificant for these little PCBs.
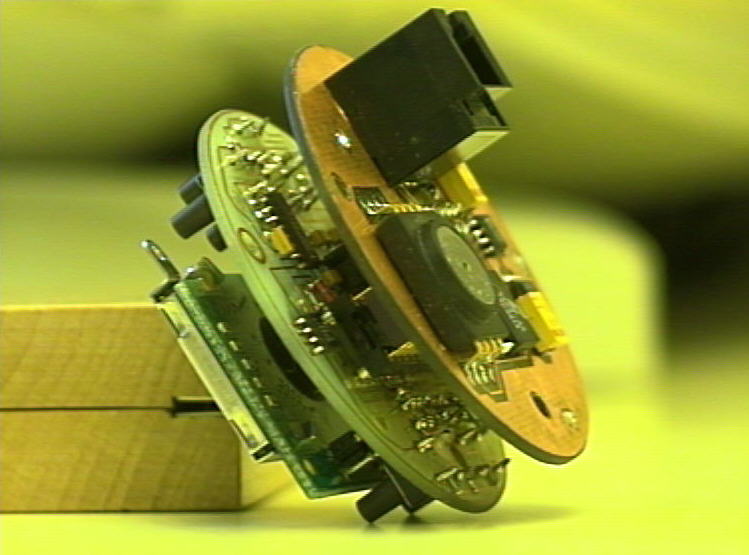
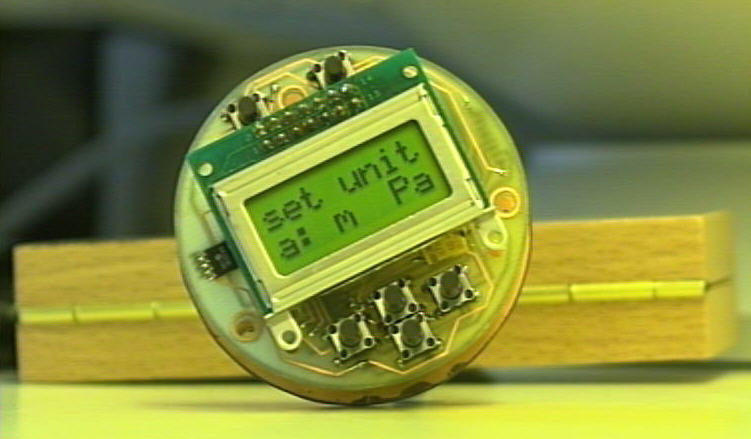
After
manufacturing and populating the PCBs, the result should look like this.
Without
the firmware the altimeter is a dead thing. I have written the here published
code with HighTech PIC-C. So it should be
possible for everybody to do changes in hard- or firmware. If you want to
publish or use my code somewhere else, then please refer the source.
Furthermore telling me via email would be
kind. I’m also interested to see, if someone has improved the code or did
increase the speed. The Hex-file can directly be programmed into the PIC, if you
don’t want to change the firmware and if you are using exactly the same
hardware.
As developing environment Microchip-MPLAB (the standard) has been used.
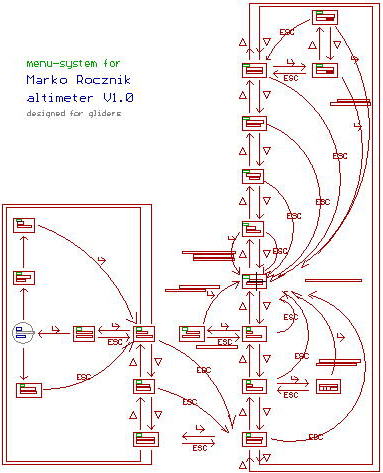
A quite comfortable menu has been implemented into the firmware. The menu route map is shown above. For detailed see the EAGLE-file of the menu block schematic. Furthermore the program includes a menu point, for transferring calibration data from a PC via RS232. Because I wanted to spend the time in developing a electronic variometer, I haven’t finished this routine and simply filled the EEPROM with the needed coefficients inside of the firmware. If you want to build up just one altimeter, then this will be the way you should use as well. For a production of this altimeter you should spend the time for writing this routine. It will enable you, to calibrate the device without opening it.
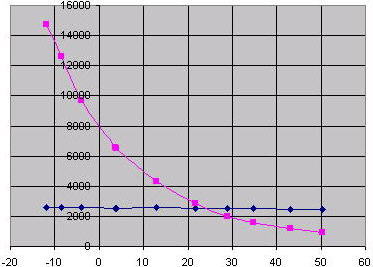
The calibrating functions are working. They are needed for calibrating the temperature sensor. The best way of processing the data and calculating the coefficients is to use Excel. For a comparisons my measurements.
I
did develop this altimeter during my time in
England (weekends and evenings). So I had to implement both units into it,
because hardly any British knows, how high a meter is ;-)
Anyway – all these things are implemented into the firmware, as well as
a software controlled LCD contrast control, auto-zero-function, … and several
other things.
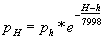
The
equation, used for calculating the ADC-value has been derived by taking in
account the datasheet of the pressure sensor and the standard atmosphere. I will
show this here. You will get better results by measuring the sensor
and fitting a equation afterwards. Don’t forget to do the measurements for all
the temperature range!
Barometric height equation:
If just you are just interested into the pressure of the standard atmosphere, then h = 0 and ph=101325Pa. Use this equation for calculating the height into the standard atmosphere:
![]()
Considering the datasheet of the MPX4100 Motorola pressure sensor, the output voltage will behave like the following:
![]()
So the theoretical 16Bit ADC-value will be:
![]()
Derived to pressure [Pa] you will get for a 5V reference voltage (Vref = 5V)
![]()
K1 = 0,69401565
K2 = 14334,2776
ErrorOffset = 0 (ideal case)
For
calculating the height above a specific pressure level, calculate the height of
the measured pressure into the standard atmosphere and subtract the height of
the pressure level, calculated for the standard atmosphere.
Have fun by developing your altimeter!
Impressum, Disclaimer & Datenschutz
![]()